Drum Sample
The Sample panel offers controls for the currently selected sample. When selecting a sample directly from the map, this panel will only contain limited options such as adding the sample to your Favorites list. However, when selecting a sample from a pad in your Drum Kit, many more options become available for shaping the sound of the sample. These include controls for pitch, filters, panning, and envelopes.
When editing a drum pad sample, any changes made will only apply to the sample in this particular drum pad. This means that the same sample used elsewhere in other Drum Kits, or even in other pads in the same Drum Kit, will not be affected. Select multiple drum pads to edit all of their sample parameters at once. Rather than displaying each individual value when you do this, the UI will reflect the range of values covered by the selected drum pads.
Most common adjustments can be made from the main panel, while more in-depth adjustments are available on the Advanced panel. The Advanced panel also includes a Variation section for introducing elements of randomness, causing each sample instance to sound slightly different from each other. This is useful for making your Sequence sound less robotic.
When you first create a Drum Kit, the samples will be played using the exact same audio files that are used in the map. However, when a Drum Kit is saved, Atlas will copy the original sample file from the map into the Drum Kit file, and the original audio file will no longer be referenced by that Drum Kit. Therefore, after saving a Drum Kit, you will only need your Atlas content folder to be available in order to play the audio.
- Show on Map
- Show file on Disk
- Sample Name
- Download High Quality
- Favorite
- Drag drop Sample file
- Output Channel
- Mute
- Solo
- Lock
- Randomize
- Parameter Controls
- Parameter Controls: Lock Controls
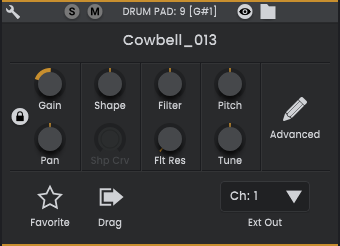
- Parameter Controls: Gain
- Parameter Controls: Pan
- Parameter Controls: Shape
- Parameter Controls: Shape Curve
- Parameter Controls: Filter
- Parameter Controls: Filter Resonance
- Parameter Controls: Pitch
- Parameter Controls: Fine Tune
- Advanced sample panel
Show on Map

Center the map view on this Sample. This is only available if the Drum Sample is from the current open Map.
Show file on Disk

Open Explorer/Finder to show the location of the sample file on your computer.
Sample Name

This is the file name of the sample with the file extension removed. To see the full file path of the sample, hover over this and look at the Tooltip area at the bottom of the app window.
Download High Quality

Download as 'high quality' (Cloud Map only)
If you are currently using a low quality (LQ) preview of this sample, click to download the full resolution audio file. This button is only available when using a Cloud Map.
Favorite

Add the sample to your collection of Favorites. This sample will then be included when you toggle on the Show Favorites option in the map.
Drag drop Sample file

Click and drag this icon to copy the sample file to a location on your computer or DAW.
Output Channel

Route the drum pad to a particular Atlas output channel. Each of these channels correspond to an audio channel in your DAW, allowing you to process each drum pad, or groups of drum pads, independently.
The Sequential setting will route each drum pad to its own output channel corresponding to the drum pad number e.g. Drum Pad 1 = Output 1, Drum Pad 2 = Out 2.
Mute

Mute this drum pad, preventing the sample from being triggered. Any samples that are already playing when the drum pad is muted will play to completion, without being cut off.
Solo

Play only this drum pad, muting all other samples in the drum kit.
Lock

Lock all drum pad parameters so they will remain unchanged when selecting a new sample for the drum pad. (including when pressing New Kit). Only visible in 8x8 Drum Pad mode.
Randomize

Pick a new sample in the same category from the Map.
Parameter Controls
Parameter Controls: Lock Controls

Lock all drum pad parameters so they will remain unchanged when selecting a new sample for the drum pad. (including when pressing New Kit).
Parameter Controls: Gain

Adjust the gain (input level) of the currently selected drum pad sample. This will not affect other drum pads in the kit.
Parameter Controls: Pan

Pan the sample to the left or right of the stereo field.
Parameter Controls: Shape

Adjust either the Attack or Release envelope of the sample.
Set it to the left to adjust the Release envelope, allowing you to cut the sample short or to fade it out over a longer time.
Set it to the right to adjust the Attack envelope, allowing you to fade the sample in gradually.
Parameter Controls: Shape Curve

Adjust the slope of the Shape envelope set above, changing the rate at which the Attack or Release envelope acts on the sample. Set it to the left for a logarithmic fade-in or decay, to the right for an exponential curve, or keep it centered for a linear slope.
Parameter Controls: Filter

A combined low-pass or high-pass filter control. Both filters use a slope of 12dB per octave.
Set it to the left for a low-pass filter, cutting out the high frequencies above your specified cutoff frequency. Set it to the right for a high-pass filter, cutting frequencies below the specified point.
Parameter Controls: Filter Resonance

Set the resonance of the Filter above. Increase to accentuate (amplify) the cutoff frequency of the filter, shaping and coloring the sound. Set the value to approximately 0.4 or above if you wish to hear a more prominent effect.
Parameter Controls: Pitch

Adjust the tuning of the drum pad sample by semitones, up to a maximum of 12 semitones (one octave) higher or lower in pitch.
Parameter Controls: Fine Tune

Finely adjust the tuning of the drum pad sample by cents, up to a maximum of 100 cents (1 semitone) higher or lower in pitch.
Advanced sample panel

Open/Close the Advanced Sample panel.