Sequencer
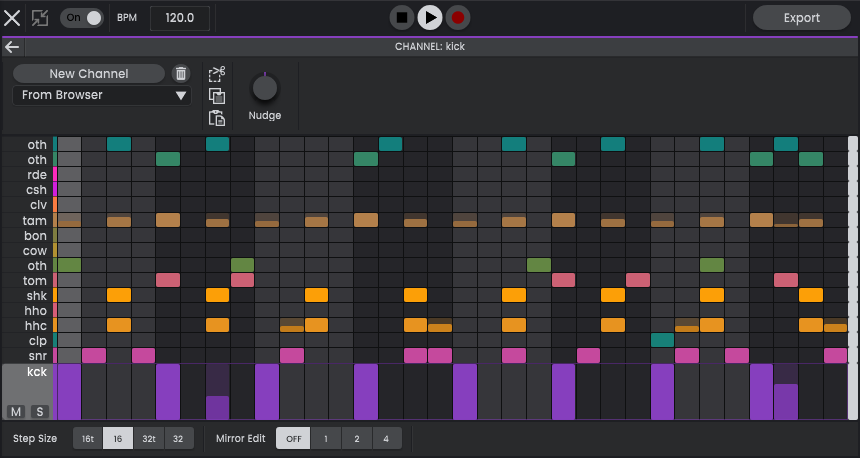
The Sequencer is where you program, or record, the note information for your beats and loops in Atlas, i.e. when each sample in your Drum Kit will be triggered. Click the Sequencer button on the top left to open the Sequencer window and begin creating your Loop.
Each row in the Sequencer triggers a corresponding drum pad, which will be highlighted when you hover your mouse over the row. Each column represents a step through time, with the length of each step determined by the Step Size setting.
Click to add a new note (trigger), or click on an existing note to remove it. You can also click and drag to add or remove multiple notes in a row. Don’t worry about keeping your mouse within the particular row while dragging, Atlas will only edit the row that you first clicked on. Click on the name of a row to expand the channel options, and to edit note velocities for that channel. Hold Shift or Ctrl/Cmd to select multiple channels at once.
In addition to manually programming them, you can also load an existing Sequence from the Browser, generate Sequences using the New Sequence button, or record from any MIDI input. For recording, click Record to arm the Sequencer and then click Play to begin looping the sequence and capturing your performance. You can record a brand new sequence or add to an existing sequence. Before recording, it may help to enter a steady rhythm, for example a hi-hat beat, to act as a metronome. Recorded notes will be quantized to the current Step Size , and the velocity information will be captured from your performance.
Finally, if you have an existing MIDI sequence, you can drag and drop it into the Sequencer from your computer. Atlas will attempt to detect the root note of your MIDI file and shift the notes up or down to match your current Root Note setting. If your file is formatted according to the General MIDI template, hold the Shift key while importing to use that template.
- Header
- Header: Maximise
- Header: On/Off
- Header: BPM
- Header: Host BPM Sync (plugin only)
- Header: Stop
- Header: Play/Pause
- Header: Record
- Header: Export
- Sequence Settings
- Sequence Settings: New Sequence
- Sequence Settings: Clear
- Sequence Settings: Shuffle
- Sequence Settings: Rotate Notes
- Sequence Settings: Length
- Channel Settings
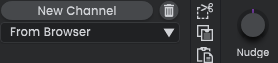
- Channel Context: New Channel
- Channel Context: Clear
- Channel Context: Copy-Paste
- Channel Context: Nudge
- Channel
- Sequence Editor Settings
Header

Header: Maximise

Toggle this on to have the Sequencer window take up the entire Atlas window.
Header: On/Off

Switch Off to stop all note information from the Sequencer from reaching the drum pads, preventing the samples from playing. All of your note information will remain intact, and you can turn the switch back On to resume triggering the samples from the Sequencer. This is useful when you want to trigger the drums from MIDI in your DAW instead of the Atlas Sequencer.
Header: BPM

The tempo of the sequence in beats per minute, determining how fast it will play. When using Atlas in a DAW, the BPM will be linked to the tempo of your project, otherwise you enter the tempo directly.
Alternatively, tap the tempo by clicking your mouse in time on the BPM label. Tap tempo is particularly useful for syncing the Sequencer with other audio or matching the beat in your head.
Header: Host BPM Sync (plugin only)

When this is enabled the Atlas Sequencer will automatically follow the DAW BPM setting. Usually you want this on but sometimes you might turn this off to preview existing Atlas Loops and Sequences at their original tempo.
Header: Stop

Stop the sequence from playing and return the playback position to the start of the sequence.
Header: Play/Pause

Play or pause the sequence. A currently paused sequence will begin playing from the point at which it was paused.
Header: Record

Add notes into the Sequence by recording live MIDI inputs, allowing you to perform new patterns or add notes to existing patterns. Click Record to arm the Sequencer and then click Play to begin looping the sequence and capturing your performance. Notes will be quantized to the current Step Size , and the velocity information will be captured from your performance.
Standalone only: If your controller is not triggering the drum pads, open the Audio/MIDI Settings in the Atlas Options menu and make sure your controller is selected under Active MIDI Inputs .
Header: Export

Export the Sequence as MIDI or audio, either in its entirety or as separate stems.
Sequence Settings

The settings for the current Sequence. Shown when no Channels are selected.
Sequence Settings: New Sequence
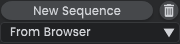
Generate a new Sequence from the source selected in the dropdown below.
- From Browser: Randomly select an existing Sequence from the content folders shown in the Atlas Browser panel.
- Random Chaos: Generate a completely random Sequence, perfect for experimentation.
- Variation: Makes adjustments to the current Sequence, which is useful for finding new ideas based on a Sequence you like.
Sequence Settings: Clear

Remove all note information from the Sequence, leaving you with an empty Sequence.
Sequence Settings: Shuffle

Introduce swing to the entire Sequence, adding groove to the beat.
Sequence Settings: Rotate Notes

Shift all of the notes in the sequence one step to the left or right. The amount of time they shift forwards or backwards will therefore depend on the Step Size setting.
Sequence Settings: Length

The total number of beats in the Sequence. After playing this many beats, the Sequence will loop back to start again from the beginning.
Channel Settings
The settings for the current selected Sequence Channel . Shown when one or more Channels are selected.
Channel Context: New Channel
Generate a new pattern for this drum pad, including velocity values, from the source selected in the dropdown below.
- From Browser: Randomly select a pattern from an existing Sequence in the content folders shown in the Atlas Browser panel.
- Random Chaos: Generate a completely random pattern, perfect for experimentation.
- Variation: Makes adjustments to the existing pattern, which is useful for finding new ideas based on a pattern you like.
Channel Context: Clear

Remove all note information from the Channel, leaving you with an empty Channel.
Channel Context: Copy-Paste

These buttons allow you to cut or copy all notes from one channel and paste them into another channel. For example, you could cut the hi-hat pattern and paste it onto a shaker channel to change the sound of your beat.
Channel Context: Nudge

Shift the timing of this particular drum pad. Adjust it to the right to cause the sample to play a little later, lagging behind the grid, or to the left to bring it earlier in time. This is useful if a sample is not sitting perfectly in time with the rest of your Sequence, or if you would like to give your beat a relaxed or rushed groove.
Channel

Channel: Mute
Mute this drum pad, preventing the sample from being triggered. Because this mutes the triggers and not simply the audio, any samples that are already playing when the drum pad is muted will play to completion, without being cut off. This setting is linked to the Mute setting on the Sample panel.
Channel: Solo
Play only this drum pad, muting all other samples in the Drum Kit. Any other samples that are already playing when this drum pad is soloed will play to completion, without being cut off. This setting is linked to the Solo setting on the Sample panel.
Channel: Category
The type of sample loaded into this Sequencer Channel.
Click this to expand the detailed options for this channel. Click again to deselect the Channel.
Channel: Note Editor
Normal
Click an empty grid space to add a note at full velocity. Click a note to remove it.
Channel selected/expanded
When a Channel is expanded, the height of each note will represent its velocity. Click on a note to adjust its velocity, changing the volume of each note independently to produce variation and a more human-sounding performance. Drag the velocity down to 0 to delete the note entirely.
Channel: Polyrhythm
Set the loop length for a particular channel, which can be set shorter than the length of the entire Sequence. This will cause the pattern for that particular drum pad to loop more frequently than the Sequence as a whole, and can be used in this way to generate polyrhythms.
Sequence Editor Settings
Sequence Editor Settings: Step Resolution

The number of steps in each bar, with higher Step Sizes allowing you to program shorter individual notes and faster rhythms. For example, a setting of 16 means that each step represents one sixteenth note, while a setting of 32 allows you to enter faster rhythms. The 16t and 32t Step Size options change the grid from the standard divisions to 4 to triplet rhythms, which can produce a feeling of swing and groove. Changing Step Sizes will not affect existing notes, so you can program or record different parts using different Step Sizes.
Sequence Editor Settings: Mirror Edit

This saves time when adding repeating notes, for example hi-hats, into your sequence. When Mirror Edit is on, Atlas will automatically add extra notes for each note that you manually enter. The position of these extra notes is determined by the beat increment setting.
For example, if you have selected Mirror Edit 1, Atlas will automatically add a note at an equivalent step for every single beat in the sequence. With Mirror Edit 2 selected, Atlas will add an extra note every 2 beats.
Mirror Edit also works in the same way for editing note velocities, which is very useful for hi-hats and shaker rhythms, and for removing notes.